NOTE: Please make sure that you should have a login mechanism implemented on WIX, i.e. Member area should be present!1. Please Log in to your Wix dashboard
2. For the website where you want to add AtomChat, please click on Edit Site

3. Then under the option Site, please select the Go to Editor option. Please refer to the screenshot below:

4. Select the Switch to Editor option.

5. Now, click on the '+' icon to add AtomChat's Embedded layout code.

6. Click on the Embed option and then select 'Embed a widget'. Please refer to the screenshot below.

7. A draggable iframe will open. This is where AtomChat will be embedded. So, please drag and adjust the height and width of the iframe. Then, click on Enter code.

8. Copy the code given below and add it under the HTML Code section.
NOTE:
Please replace the "APP_ID" and "AUTH_KEY" values in the code with your own Keys from your AtomChat Admin Panel -> API Keys
<script>
var chat_appid = 'APP_ID';
var chat_auth = 'AUTH_KEY';
</script>
<script>
var chat_height = '600px';
var chat_width = '990px';
document.write('<div id="cometchat_embed_synergy_container" style="width:'+chat_width+';height:'+chat_height+';max-width:100%;border:1px solid #CCCCCC;border-radius:5px;overflow:hidden;"></div>');
var chat_js = document.createElement('script'); chat_js.type = 'text/javascript'; chat_js.src = 'https://fast.cometondemand.net/'+chat_appid+'x_xchatx_xcorex_xembedcode.js';
chat_js.onload = function() {
var chat_iframe = {};chat_iframe.module="synergy";chat_iframe.style="min-height:"+chat_height+";min-width:"+chat_width+";";chat_iframe.width=chat_width.replace('px','');chat_iframe.height=chat_height.replace('px','');chat_iframe.src='https://'+chat_appid+'.cometondemand.net/cometchat_embedded.php'; if(typeof(addEmbedIframe)=="function"){addEmbedIframe(chat_iframe);}
}
var chat_script = document.getElementsByTagName('script')[0]; chat_script.parentNode.insertBefore(chat_js, chat_script);
</script>
9. Now, from the menu on the left, please click on Public & Backend. Then, under Backend, please select '+Add web module'.

10. Now, rename the default .jsw file to atomchat.jsw
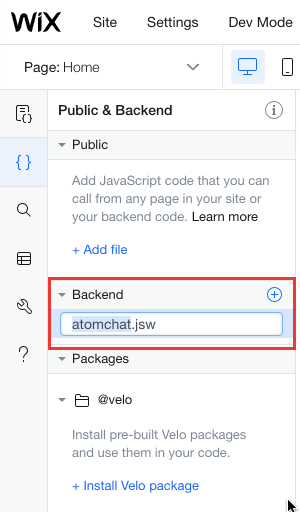
11. Now, you will see atomchat.jsw added as a page. Please open it! You can refer to the screenshot below:

12. You will see a pre-added export function here. Please do not delete it. Above the export function, please copy the following code:
NOTE:
Please replace the "APP_ID" and "AUTH_KEY" values in the code with your own Keys from your AtomChat Admin Panel -> API Keys
import {fetch} from 'wix-fetch';

let apiKey = 'API_KEY';

export function createUser(uid,name,userAvatar) {
  const url = "https://api.cometondemand.net/api/v2/createUser";

  const headers = {
    "api-key": apiKey,
    "Content-Type": "application/x-www-form-urlencoded"
};

  const data = `UID=${uid}&name=${name}&avatarURL=${userAvatar}`;

  const request = {
    "method": "post",
    "headers": headers,
    "body": data
};

  return fetch(url, request)
.then(response => response.json());
}

export function updateUser(uid,name,userAvatar) {
  const url = "https://api.cometondemand.net/api/v2/updateUser";

  const headers = {
    "api-key": apiKey,
    "Content-Type": "application/x-www-form-urlencoded"
};

  const data = `UID=${uid}&name=${name}&avatarURL=${userAvatar}`;

  const request = {
    "method": "post",
    "headers": headers,
    "body": data
};

  return fetch(url, request)
.then(response => response.json());
}

export function getUser(uid,name) {
  const url = "https://api.cometondemand.net/api/v2/getUser";

  const headers = {
    "api-key": apiKey,
    "Content-Type": "application/x-www-form-urlencoded"
};

  const data = `UID=${uid}`;

  const request = {
    "method": "post",
    "headers": headers,
    "body": data
};

  return fetch(url, request)
.then(response => response.json());
}
Screenshot for reference:


13. Now, open the page where you want to Embed AtomChat and past the following code:
import wixUsers from 'wix-users';
import wixWindow from 'wix-window';
import {createUser} from 'backend/atomchat';
import {getUser} from 'backend/atomchat';
import {updateUser} from 'backend/atomchat';
import wixData from 'wix-data';

let appId = 'APP_ID';
let auth_key = 'AUTH_KEY';

wixUsers.onLogin( (user) => {
  addChat();
} );

$w.onReady(function () {
  addChat();
});

function addChat() {
  let user = wixUsers.currentUser;
  let userId = user.id;
  let isLoggedIn = user.loggedIn;
  let userEmail;
  let userRole;
  let item;
  let username;
  let userAvatar;
  let userProfile;


  if (isLoggedIn === true) {
    var getUserEmail = user.getEmail();
    var getUserDetails = getUserEmail.then(function(email){
      //if users are coming from wix database then pass databasename in place of collection name
      wixData.get('Members/PrivateMembersData', user.id).then((results) => {
        item = results;
        username = item.name;
        if(username === '' || typeof username === "undefined"){
          username = email;
        }
        userAvatar = item.picture;

            userProfile = item['link-Members-_id'];

            createUser(userId,username,userAvatar).then(response => {
              getUser(userId).then(userInfo => {
                let cid = userInfo.success.data.user.cid;
            var userinfo = {
              id: userInfo.success.data.user.uid,
              n: userInfo.success.data.user.name,
              a: userInfo.success.data.user.avatar,
              role: userInfo.success.data.user.role,
              auth: auth_key
            }
            let basedata = encodeURIComponent(btoa(encodeURIComponent(JSON.stringify(userinfo))));

                $w("#html1").src = "https://"+appId+".cometondemand.net/cometchat_embedded.php?basedata="+basedata;

              })
            });
            updateUser(userId,username,userAvatar).then(response => {
            })
          });
    });
  }

}
NOTE:
Please replace the "APP_ID" and "AUTH_KEY" values in the code with your own Keys from your AtomChat Admin Panel -> API KeysIn our reference screenshot, we have added the code to the page Home.

14. Save the changes and Preview/Publish. AtomChat is added to your website!

In order to make the Audio/Video call feature of AtomChat work on Chrome browser:
You need to add Custom Code which will add the “allow“ attribute to the iframe.
Custom Code option is available for paid plans.
1. Open your Wix Dashboard
2. Go to Settings (Scroll down) → Advanced → Custom Code → Paste the following code snippet:
<script>
  var setTime = setInterval(function(){
     var iframes = document.querySelectorAll("iframe"); // finds all iframes
     for (var i = 0; i < iframes.length; i++) {
        var name = iframes[i].getAttribute("name")
        if (name!=null && name.includes("htmlComp")) {
           iframes[i].setAttribute("allow", "geolocation; microphone; camera; midi; encrypted-media;")
        }
     }
  },10000);
</script>
3. For "Add Code to Pages:", Choose a specific page and select the page where you have added the AtomChat.
4. For "Place Code in:", select Body - end
5. Click Apply
6. Save the changes and preview/publish them.
Contact Sync
Your user list on AtomChat will get populated and they will be visible in the Chat Contact list once they log in to your Wix website after integrating AtomChat. So, users are added on-the-fly as they login.
Need help Integrating?
We've got you! Please Contact Us if you need any help or have questions.
You can also schedule a remote Integration Assistance meeting with our team of experts!
Happy to help :)
Was this article helpful?
That’s Great!
Thank you for your feedback
Sorry! We couldn't be helpful
Thank you for your feedback
Feedback sent
We appreciate your effort and will try to fix the article