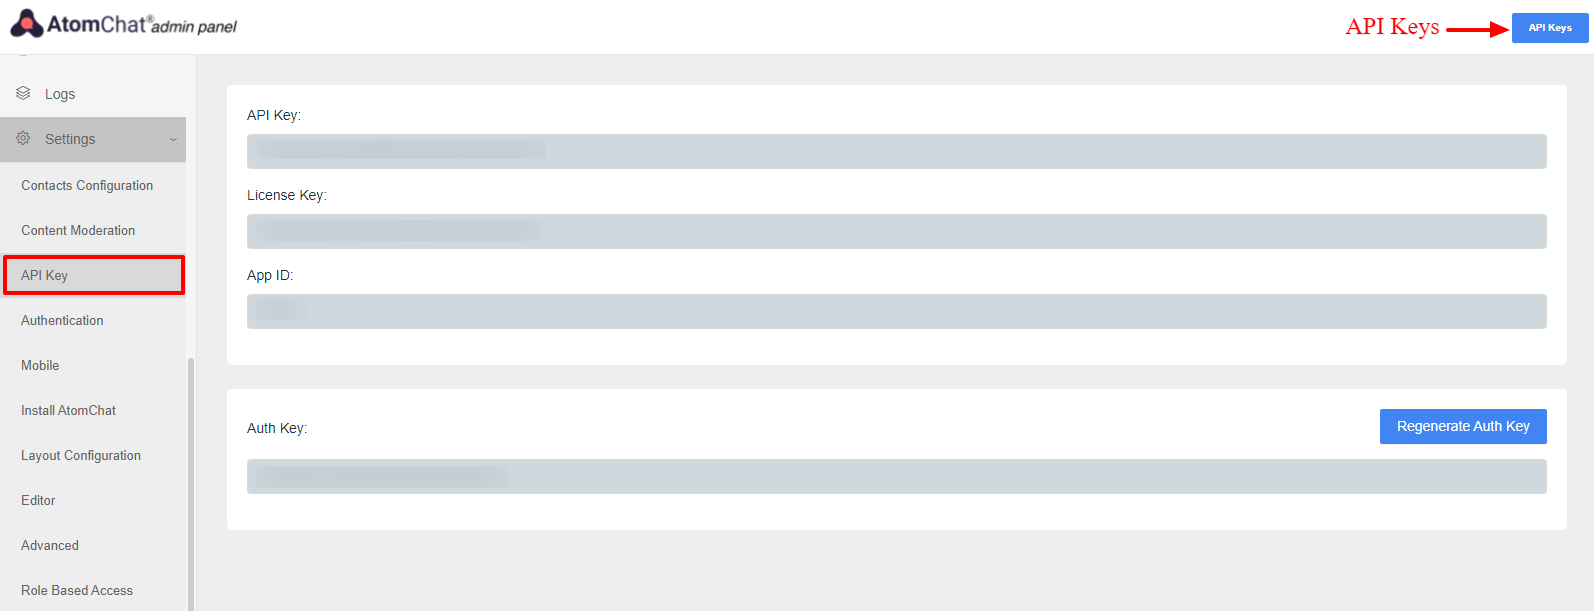
Sign in to your AtomChat Client Area and click on the Manage button and then note down the keys present in API Keys (top right button) section - API Key, Auth Key, License Key and App ID. You may need these during installation.
For successful integration, please ensure your domain or local environment is SSL certified and secure.
Choose a layout
AtomChat offers 2 Layouts
1. Docked Layout creates a floating chat widget at the bottom right/left corner of your website.
2. Embedded Layout embeds a chat interface inside any page of your website
And please remember!
AtomChat layouts are not designed to be used together on the same page. If you add both layouts on the same page, please expect erratic behavior from the software.

Please copy the code given below and replace APP_ID and AUTH_KEY with your unique keys.
Then follow the instructions given in the section - "Where to add this code?"
NOTE:
Please replace the "APP_ID" and "AUTH_KEY" values in the code with your own Keys from your AtomChat Admin Panel -> API Keys
<script>
var chat_appid = 'APP_ID';
var chat_auth = 'AUTH_KEY';
</script>
<script>
if(document.getElementById("cUserLink") != null || document.getElementById("cUserLink") != "null" || document.getElementById("cUserLink") != ""){
    chat_id = document.querySelector("#elUserNav #cUserLink .ipsUserPhoto").getAttribute("href").split("profile/")[1].split("-")[0];
    chat_name = document.querySelector("#elUserNav #cUserLink #elUserLink").innerText;
    chat_avatar = document.querySelector("#elUserNav #cUserLink .ipsUserPhoto img").src;
    chat_link = document.querySelector("#elUserLink_menu [title='Go to your profile']").href;
    //If you want to fetch chat role add thease lines
    chat_role = "";

    const communityUrl = 'https://benzobuddies.org/api/core/members/'+chat_id;
    const apiKey = 'Your-API-Key';
    fetch(communityUrl, {
      method: 'GET',
      headers: {
        'Authorization': 'Basic ' + btoa(apiKey + ':'),
        'User-Agent': 'MyUserAgent/1.0'
      }
    })
    .then(response => {
        if (!response.ok) {
          throw new Error('Network response was not ok ' + response.statusText);
        }
        return response.json();
    })
    .then(data => {
      chat_role = data.primaryGroup.formattedName;
    })
    .catch(error => {
      console.error('There was a problem with the fetch operation:', error);
    });
    //End of chat role
}
</script>
<script>
    (function() {
        var chat_css = document.createElement('link'); chat_css.rel = 'stylesheet'; chat_css.type = 'text/css'; chat_css.href = 'https://fast.cometondemand.net/'+chat_appid+'x_xchat.css';
        document.getElementsByTagName("head")[0].appendChild(chat_css);
        var chat_js = document.createElement('script'); chat_js.type = 'text/javascript'; chat_js.src = 'https://fast.cometondemand.net/'+chat_appid+'x_xchat.js'; var chat_script = document.getElementsByTagName('script')[0]; chat_script.parentNode.insertBefore(chat_js, chat_script);
    })();
</script>
Where to add this code?
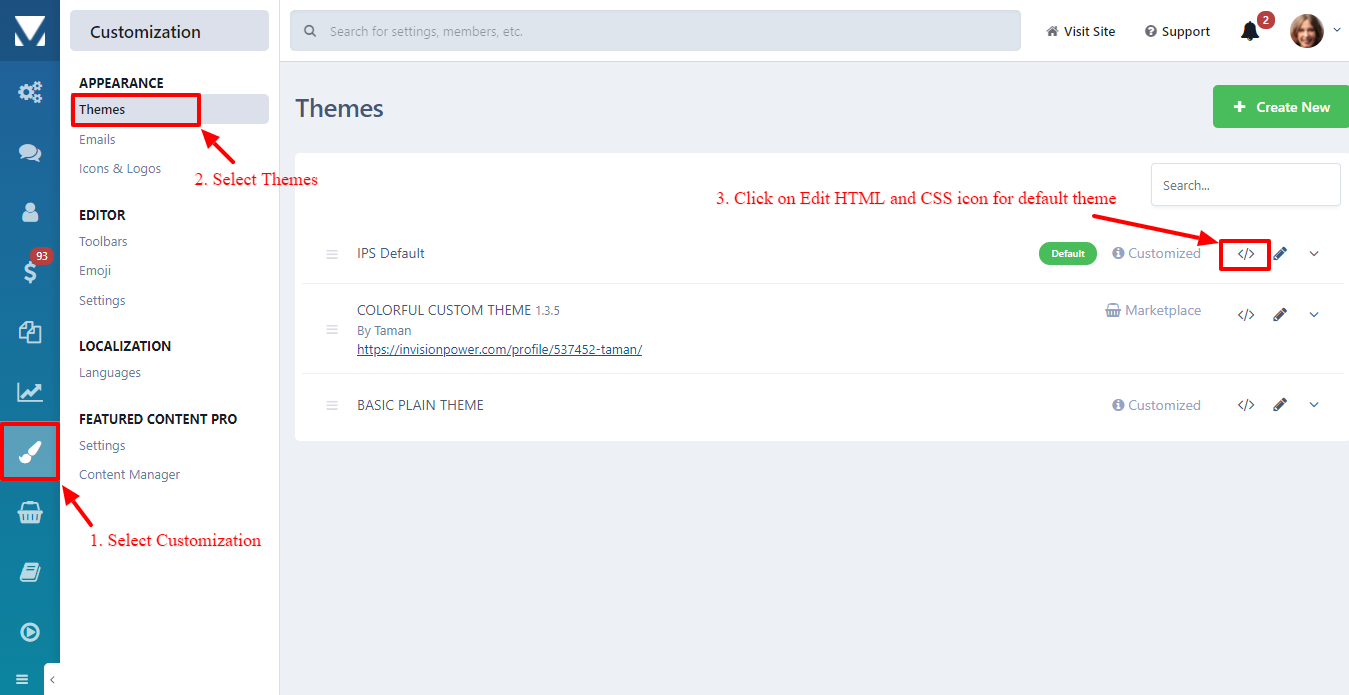
- Login to your IPB AdminCP → Customization section → Select Themes → In front of your default theme, click on "Edit HTML and CSS" icon (refer following screenshot for the same).
- The "globalTemplate" will get opened. Scroll down to bottom and the above docked layout code right before the closing </body> tag and save the globalTemplate.
You can learn more about how to modify your template in the IPB Documentation.
Please copy the code given below and replace APP_ID and AUTH_KEY with your unique keys.
Then follow the instructions given in the section - "Where to add this code?"
NOTE:
Please replace the "APP_ID" and "AUTH_KEY" values in the code with your own Keys from your AtomChat Admin Panel -> API Keys
<script>
var chat_appid = 'APP_ID';
var chat_auth = 'AUTH_KEY';
</script>
<script>
if(document.getElementById("cUserLink") != null || document.getElementById("cUserLink") != "null" || document.getElementById("cUserLink") != ""){
  chat_id = document.querySelector("#elUserNav #cUserLink .ipsUserPhoto").getAttribute("href").split("profile/")[1].split("-")[0];
  chat_name = document.querySelector("#elUserNav #cUserLink #elUserLink").innerText;
  chat_avatar = document.querySelector("#elUserNav #cUserLink .ipsUserPhoto img").src;
  chat_link = document.querySelector("#elUserLink_menu [title='Go to your profile']").href;
}
</script>
<script>
var chat_height = '600px';
var chat_width = '100%';

document.write('<div id="cometchat_embed_synergy_container" style="width:'+chat_width+';height:'+chat_height+';max-width:100%;border:1px solid #CCCCCC;border-radius:5px;overflow:hidden;"></div>');

var chat_js = document.createElement('script'); chat_js.type = 'text/javascript'; chat_js.src = 'https://fast.cometondemand.net/'+chat_appid+'x_xchatx_xcorex_xembedcode.js';
chat_js.onload = function() {
    var chat_iframe = {};chat_iframe.module="synergy";chat_iframe.style="min-height:"+chat_height+";min-width:"+chat_width+";";chat_iframe.width=chat_width.replace('px','');chat_iframe.height=chat_height.replace('px','');chat_iframe.src='https://'+chat_appid+'.cometondemand.net/cometchat_embedded.php'; if(typeof(addEmbedIframe)=="function"){addEmbedIframe(chat_iframe);}
}
var chat_script = document.getElementsByTagName('script')[0];chat_script.parentNode.insertBefore(chat_js, chat_script);
</script>- Paste the the above code in any page of your site where you want Chat to appear. You can add above code in existing pages or you can create new page and add code there.
- Where you can find pages on your site -
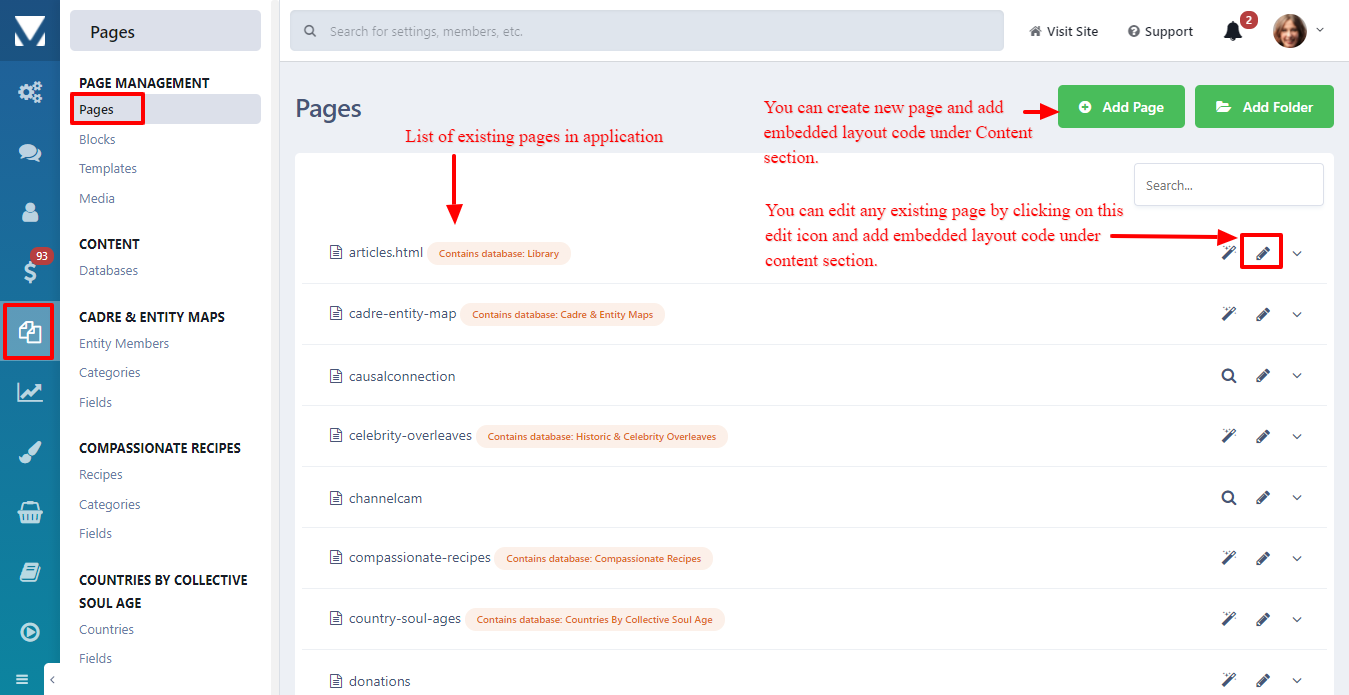
- Login to your IPB AdminCP → Pages section → Select Pages
- If you wanted to add embedded layout in existing page, the edit that existing page and add the above code under "Content" section.
- If you wanted to create new page for chat, then with "Add Page", you can create new page and add the above code under "Content" section.
Your users will be visible on the contact list once they log in using their credentials again to the site after installation.
IMPORTANT
Before you go live, follow our security guide to ensure your integration is secure.
Jump to Security Guide
Congrats!! You are all set to start using AtomChat!
Was this article helpful?
That’s Great!
Thank you for your feedback
Sorry! We couldn't be helpful
Thank you for your feedback
Feedback sent
We appreciate your effort and will try to fix the article