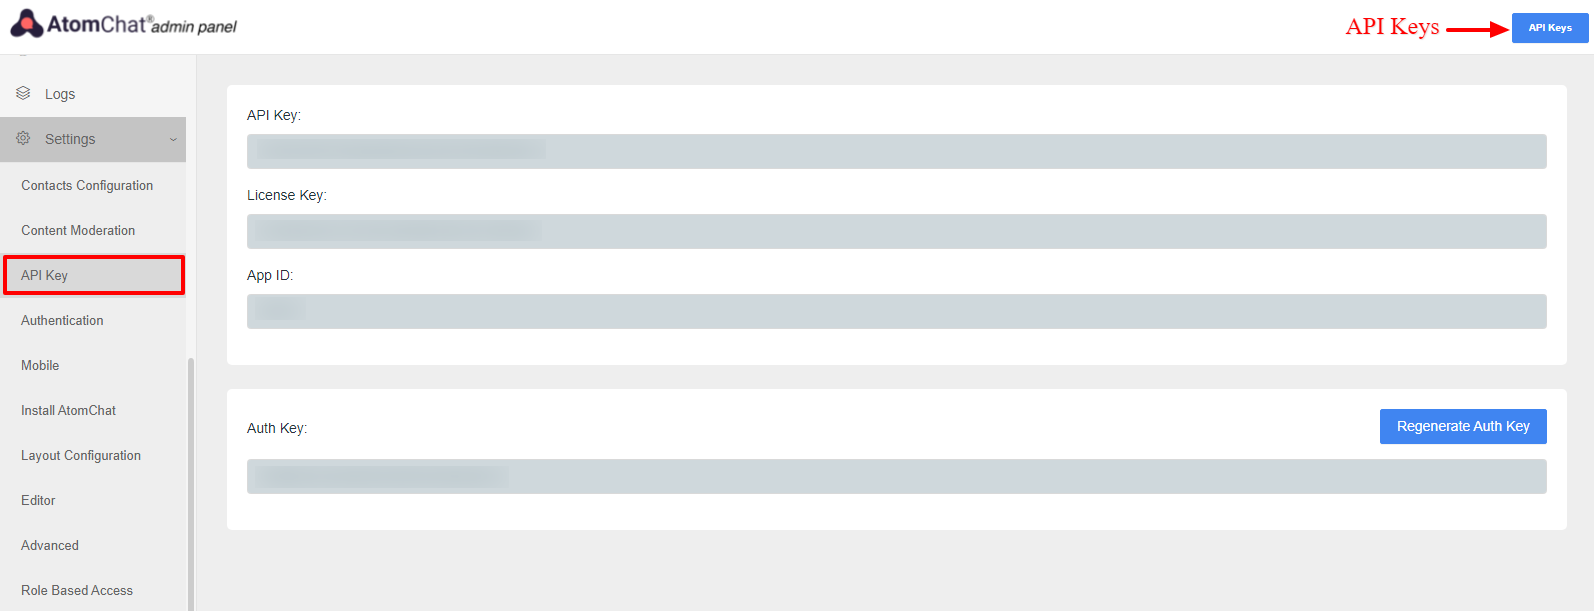
Sign in to your AtomChat Client Area and click on the Manage button and then note down the keys present in the API Keys (top right button) section - API Key, Auth Key, License Key, and App ID. You may need these during installation.
For successful integration, please ensure your domain or local environment is SSL certified and secure.
AtomChat offers 2 Layouts
1. Docked Layout creates a floating chat widget at the bottom right/left corner of your website.
2. Embedded Layout embeds a chat interface inside any page of your website
And please remember!
AtomChat layouts are not designed to be used together on the same page. If you add both layouts on the same page, please expect erratic behavior from the software.
AtomChat layouts are not designed to be used together on the same page. If you add both layouts on the same page, please expect erratic behavior from the software.

Please copy the code given below and replace APP_ID and AUTH_KEY with your unique keys.
Then follow the instructions given in the section - "Where to add this code?"
NOTE:
Please replace the "APP_ID" and "AUTH_KEY" values in the code with your own Keys from your AtomChat Admin Panel -> API Keys
<script>
var loggedIn = document.querySelector('.user_account');
var chat_appid = 'APP ID';
var chat_auth = 'Auth Key';
</script>
<script>
const user = window.sessionStorage.getItem('user');
if (user) {
var { chat_name, chat_id, chat_avatar } = JSON.parse(user);
} else if(document.querySelectorAll('#container a')[0].getAttribute('href') != undefined && typeof cc_base == 'undefined') {
var chat_link = document.querySelectorAll('#container a')[0].getAttribute('href'),
link_array = chat_link.split('/');
chat_name = link_array[link_array.length-1];
chat_id = btoa(chat_name);
chat_avatar = document.querySelectorAll('#container .sidebar img')[0].getAttribute('src');
window.sessionStorage.setItem('user', JSON.stringify({ chat_name, chat_id, chat_avatar }));
}
</script>
<script>
if (loggedIn) {
(function() {
var chat_css = document.createElement('link');
chat_css.rel = 'stylesheet'; chat_css.type = 'text/css';
chat_css.href = 'https://fast.cometondemand.net/'+chat_appid+'x_xchat.css'; document.getElementsByTagName("head")[0].appendChild(chat_css);
var chat_js = document.createElement('script');
chat_js.type = 'text/javascript'; chat_js.src = 'https://fast.cometondemand.net/'+chat_appid+'x_xchat.js'; var chat_script = document.getElementsByTagName('script')[0]; chat_script.parentNode.insertBefore(chat_js, chat_script);})();
}
</script>1. Go to your Control Panel System -> Configuration -> Settings
2. Paste the code above the </body> tag


Please copy the code given below and replace APP_ID and AUTH_KEY with your unique keys.
Then follow the instructions given in the section - "Where to add this code?"
NOTE:
Please replace the "APP_ID" and "AUTH_KEY" values in the code with your own Keys from your AtomChat Admin Panel -> API Keys
<script>
var chat_appid = 'APP_ID';
var chat_auth = 'AUTH_KEY';
</script>
<script>
if(document.querySelectorAll('#container a.profile')[0].getAttribute('href') != undefined && typeof cc_base == 'undefined') {
var chat_link = document.querySelectorAll('#container a.profile')[0].getAttribute('href'),
link_array = chat_link.split('/'),
chat_name = link_array[link_array.length-1],
chat_id = base64_encode(chat_name),
chat_avatar = document.querySelectorAll('#container .sidebar a.image')[0].getAttribute('src');
}
</script>
<script>
var chat_height = '600px';
var chat_width = '990px';
document.write('<div id="cometchat_embed_synergy_container" style="width:'+chat_width+';height:'+chat_height+';max-width:100%;border:1px solid #CCCCCC;border-radius:5px;overflow:hidden;"></div>');
var chat_js = document.createElement('script'); chat_js.type = 'text/javascript'; chat_js.src = 'https://fast.cometondemand.net/'+chat_appid+'x_xchatx_xcorex_xembedcode.js';
chat_js.onload = function() {
var chat_iframe = {};chat_iframe.module="synergy";chat_iframe.style="min-height:"+chat_height+";min-width:"+chat_width+";";chat_iframe.width=chat_width.replace('px','');chat_iframe.height=chat_height.replace('px','');chat_iframe.src='https://'+chat_appid+'.cometondemand.net/cometchat_embedded.php'; if(typeof(addEmbedIframe)=="function"){addEmbedIframe(chat_iframe);}
}
var chat_script = document.getElementsByTagName('script')[0];chat_script.parentNode.insertBefore(chat_js, chat_script);
</script>- Find the footer.php file in your template.
- 2.This file is typically located in the templates/your_template directory.
Your users will be visible on the contact list once they log in using their credentials again to the site after installation.
IMPORTANT
Before you go live, follow our security guide to ensure your integration is secure.
Jump to Security Guide
Congrats!! You are all set to start using AtomChat!
Was this article helpful?
That’s Great!
Thank you for your feedback
Sorry! We couldn't be helpful
Thank you for your feedback
Feedback sent
We appreciate your effort and will try to fix the article